Welcome to a 4-part mini-series on the Corrective Exercise protocol for Overhead Mobility. In this series, I will break down the 4-stage Corrective Exercise Continuum (CEC) for the “arms fall forward” movement-compensation observed in an Overhead Squat Assessment (OHSA). Using this CEC will help participants improve overhead mobility, kyphotic posture, and upper body strength and conditioning. There’s no such thing as “perfect mobility” or a ceiling to how strong someone can be; anyone can benefit from this protocol.
In today’s article, we will be exploring the most effective foam rolling practices to improve overhead mobility. When using Corrective Exercise as an entire program or session, it may be appropriate to use all 3 foam rolling exercises. As a warmup for an overhead press or carry workout, it may be more appropriate to use one or two foam rolling exercises to be efficient with time. The three targets that commonly inhibit overhead mobility are the Latissimus Dorsi, the Pectorals, and the Trapezius. Here are a few videos and anatomy images to help you or your clients enhance their overhead mobility.
If you’d like a refresher on the benefits of using Foam Rolling and the Cumulative Injury Cycle, check out our past blog article here.
The Latissimus Dorsi
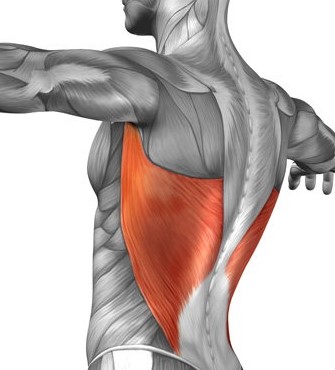
The first muscle we are going to attack is the Latissimus Dorsi. The lats pull the arms down towards the hips, internally rotate the arms, and adduct the arm when shortened. As you can see from the image above, the lats are a large muscle group and can cause some significant damage if they don’t operate properly. If the lats are tight (overactive/shortened – there are many ways to describe muscular inefficiency), then raising the arms overhead becomes a lot more challenging; oftentimes, so challenging that the brain recruits compensatory patterns to make up faulty overhead movement (upper trapezius and scalene activation for example). Foam rolling the lats doesn’t only allow for better overhead movement and neuromuscular control; it also feels great! The video below will help you get into the right position and give you an idea of using both the oscillation technique and the pin and move technique on the Latissimus Dorsi.
Lay down on the roller sideways, extend the arm and place the foam roller right underneath the shoulder blade. As we lay across the roller, we want to find a piece of tissue or a region that feels a little sore (think 5/10 on the pain scale). Pay attention to your leg position to make sure you can control your body weight. You can pull the bottom leg up towards your hips while the top leg can be pushed behind your body, creating a 90/90 position through your bent knees. Once your posture is established, we can use our pin and move technique to draw some circles with the hands. Small circles with your palm down seem to be most comfortable. The second pin and move technique you can use is from a palm-up position, this time sweeping the arm from in front of your body towards your head. Try to pull your biceps close to your ear while maintaining a straight elbow throughout the entire range of motion. Repeat on the other side.
The Pectorals
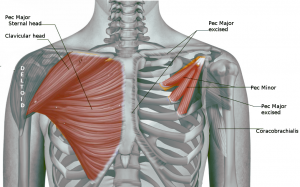
Next up are the pecs. The pec major and minor pull the shoulders forward and are chronically shortened in seated positions such as driving or working on the computer. The pec major tends to be a muscle more suited towards movement objectives, while the pec minor plays more of a stability role. Both are important, and if you find your overhead movement inhibited, they are often tight. The pecs internally rotate, adduct, and protract the humerus and scapula, respectively, sharing similar characteristics of the latissimus dorsi in the previous example. Compensatory loading of press-based movements includes elevation of the shoulders and protraction of the head, once again inhibiting mobility in the overhead position. Foam rolling the pecs will make you feel taller by naturally pushing the shoulder blades back while allowing the sternum to lift upward; clients in the past mentioned being able to breathe better after foam rolling the pecs as well!
Lay across the foam roller face-down with the foam roller positioned at a 45-degree angle across the shoulder. Place the foam roller in the pocket between the anterior deltoid and chest muscles, straightening your arm across and away from the roller. Shift your body towards the foam roller and away from it, oscillating around 1-2 inches at a time, and find a sore spot. Once found, repeat the same technique as the lats: drawing circles palm down and sweeping palm up. Combining these two “pin and move” techniques will free up a lot of space for the shoulder to move more comfortably.
The Thoracic Spine
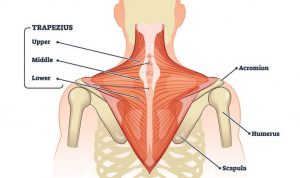
To complete the foam rolling trifecta for overhead mobility, we will be targeting the thoracic spine, specifically the lower and middle trapezius. I mentioned earlier in both foam rolling examples that compensatory patterns emerge in the upper traps if either the pecs or lats are overactive. We can safely assume that the upper traps are also overactive if this is a common compensatory pattern. The difference in this example of foam rolling is that we are using the foam roller to initially increase the lower trap muscles’ activity. This will reinforce scapular depression and improve thoracic extension. After some scrubbing in the lower traps, our pin and move technique will help us maintain scapular stability, especially while raising the arms overhead. See below for the example.
Place the foam roller underneath the shoulder blades with your feet and hips on the ground. Use your hands to support your head as you scroll up towards the head, oscillating now and again to smooth out the tissue; when you find a nice spot to pin, hold the roller there. While the tissue is “trapped” (get it?), pull the elbows together to expose different muscle fibres to the foam roller. After a moment, pull the elbows away from each other and repeat for a few reps. At this point, if you can, do some arm angels gently and smoothly to explore frontal plane mobility with the same pinned position. In the example above, Cody was having some challenges with his neck. Not everyone will have comfortable experiences with the foam roller, and it’s our job to ensure comfort and safety. As a result, we regressed to where he felt comfortable and made a note in our program.
The other pin and move technique that you can use in this position is a sagittal plane flexion and extension through the spine. Cody demonstrates a good example of using this foam rolling practice to identify other opportunities for improvement (lack of elbow extension is shown in the video above), and Logan provides an excellent example of the mobility goal for this exercise. The spinal flexion and extension in this example do 2 things: improves flexibility of the spine in the sagittal plane and work some abdominal activation at the same time. You can see that Cody’s form and flexibility improve throughout the short set that we did together. Imagine how much improvement could be observed with regular practice and appropriate integrated programming.
Foam Rolling for Overhead Mobility Precedes Stretching
Now that these muscles are warmed up and ready to move, the next step is to lengthen the same tissue foam rolled above. Try these variations of foam rolling to enhance your mobility and stick around for the upcoming article “Stretching for ‘Overhead Mobility'” coming out next Friday. See you then!


Leave A Comment