The Axle Philosophy
The Axle is a total body training program that allows each participant to tap into their inner athlete, harnessing core and muscle strength via multi-planar movement patterns. You’ll burn calories and build muscle fast with a combination of functional movements, tempo training, conditioning and core work. The Axle is fully scalable, so no matter your fitness level, you can get a fast, fun, and effective workout!
– adapted from the Axle Workshop Instructor Manual
The Axle bar itself is a manageable 11lbs and in the full body class we introduced many movements, including the unique rolling exercises.
Now, with Axle Loaded, we focus on introducing power lifts, like the clean and the split jerk, to increase power and performance. While we always aim to make our group fitness classes all-inclusive, I’d say a base level of fitness and experience with the Axle in its unloaded format would be a great idea to ensure you are safe and ready for this Loaded progression.
Let’s dive into the new moves so you are prepared!

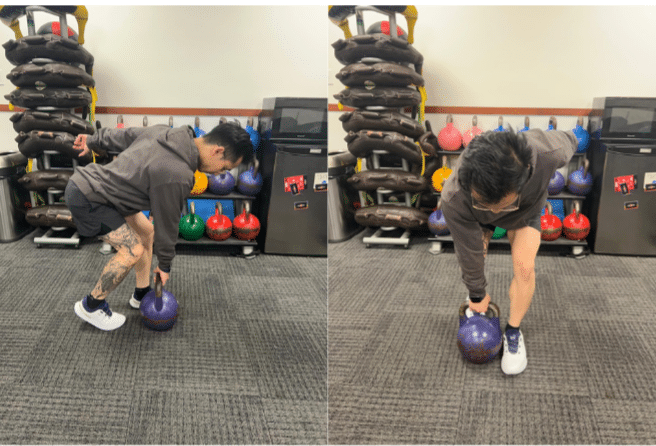
The Hinge – Squat Continuum
It’s common to think of squats, deadlifts, lunges, split squats, etc. as separate movements. But let’s look at the bilateral (both legs) lower body exercises in a continuum moving from a horizontal hinge (like a stiff leg deadlift) to a vertical squat (say, a front barbell squat.)
Using a stiff leg deadlift as an example, it’s as close to a 90 degree bend at the hips as possible. The back is flat and pretty close to parallel with the floor. Obviously, to perform this movement, you’d need enough core stability to keep your spine in neutral and enough flexibility in your superficial back line (a major muscle in this fascial line would be hamstrings) to allow for straight legs and to prevent your tailbone from tucking under and rounding the spine (a common error in deadlifts, especially heavy ones.)
Now, what we see a lot in the gym is people with limited access to the ends of the continuum ie. they have a hinge-y squat or a squat-y hinge. So, whether the barbell is being lifted from the floor or is front or back loaded, people move with a very similar angle at the hip. When there is limited access to ROM (or a lack of mobility) then movement is very repetitive and tends to load the same tissues and the same fascial patterns over and over again. This can lead to further stiffness, reduced recovery and potential injury. Or, on the other side, less strength, power and performance.
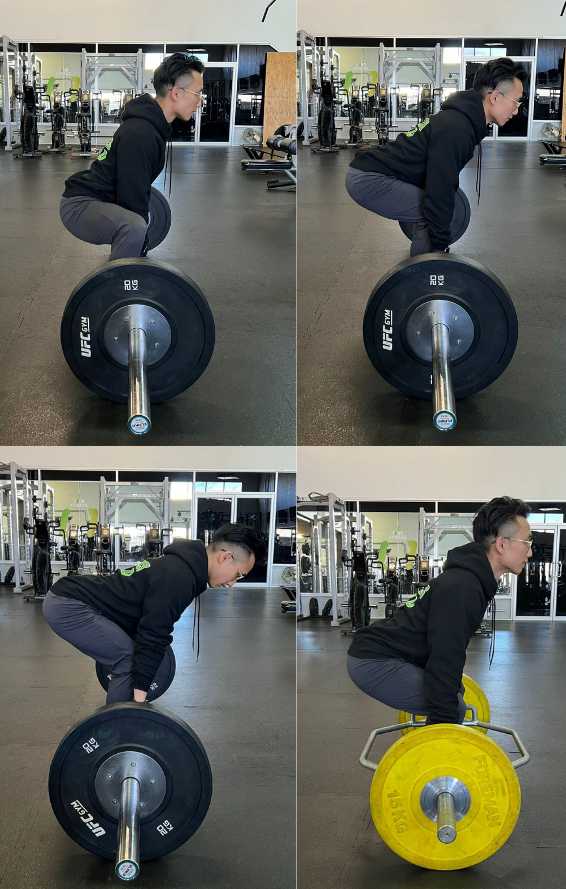
The Clean
Cleans build not just strength, but full-body power – the ability to move weight quickly. This is a great move for athletes but anyone can benefit. Anytime you lift something from the floor to your shoulder height – whether it’s a barbell, a box or a toddler – you’re doing a version of the clean. The key is that the barbell is travelling in a vertical path, staying as close to the body as possible. So your hip drive (horizontal power) has to be converted into a vertical pull. Let’s look at this quick movement in 3 stages:
- The First Pull
Feet parallel and hip width apart, hips back & long spine and your hands gripping the bar just outside your legs. Keep your arms straight and “break the bar” to engage your lats and add strength and stability to your pull. Push your knees back, lift your chest and drive your hips forward to pull the bar just above your knees.
- The Second Pull
Once the bar passes your mid-thigh it’s an all-out explosive pull or a “jump and shrug” motion. When you do that right the bar goes weightless for a fraction of a second. To make this happen you complete the hip thrust, straighten your knees and extend your ankles, as if trying to jump off the floor. (Some people get a bit of air!) Keeping the arms straight, shrug and then bend and raise your elbows high and wide. If you’ve kept the bar close to your body and used enough lower body power the bar will feel very light and you’re basically doing a passive upright row with little to no weight in the arms. The major mistake people make in this step is bending the elbows too early and allowing the bar to move away from the body.
- The Catch
This is where you position yourself under the bar as it rises in front of you, catching it on your shoulders. As the bar reaches its maximum height, pull your body underneath it and land in a solid quarter-to-half squat (your feet should be shoulder width apart, a slight increase in width from the hip width apart stance you started with.) Rotate your elbows forward and under the bar, allowing your grip on the bar to loosen as your wrists turn upwards. Catch the bar on the fronts on your shoulders. When you feel steady, stand up straight. In the catch you shouldn’t feel like you’re dropping downward. This part of the move is about speed, not strength. That being said, once you’ve completed the clean there may be a front squat in the program to add more volume and calories burned!

The Split Jerk
Once you’re at the top of the clean, now it’s just 2 more steps to get to the split jerk! This top-end effort depends heavily on the tension of your musculature in order to generate force.
The Dip Drive
To start the dip, slightly flex at the knees, pushing them out like you would in a squat. This movement should occur quickly – it’s a shallow and explosive movement. The drive is a redirection of force. Tense the legs and torso while quickly extending the ankles, knees and hips. It’s important to drive through your heels for this step.
The Receive (or Overhead Catch)
Just like in the clean, if you get the dip drive happening with enough speed and power the bar will again become weightless. This allows you to drop under the bar and lock the arms out to catch the bar overhead. In Axle we teach the split jerk (looks like a lunge) instead of the push jerk because there’s less demand for mobility and more efficiency in the split jerk. So as the bar floats, you’ll move one foot forward and simultaneously drive the back knee toward the spot on the floor your feet just occupied. Dropping under the bar means that your shoulders will only be asked to stabilize the weight, not press it up.
The Recovery
In order to lower the bar (or switch sides) you’ll need to take a half-step back with your front foot and a step forward with your back foot. This brings your feet to parallel right underneath you and then you can lower the bar back to the clean position across the front of your shoulders. It’s crucial to keep your spine and joints stacked and core braced during the recovery!
Be sure to use these techniques when classes launch at a club near you!
Safety Tips for Axle Loaded Movement
- Get medical clearance before starting any fitness training program.
- Always be aware of your surroundings. The area must be clear of objects you might trip over or hit with the Axle. Make sure you have a safety radius around you so that no one is at risk of being hit should you throw of drop the Axle.
- Make sure your bar is complete. Make sure the tow dimples at the middle of the Axle are snapped into place and both clips are securely fastened at the end of the bar.
- Never sacrifice form for more repetitions. Not everyone can do the same number of repetitions, especially in a group class.
- Brace! Don’t perform a movement if your body requires forward spine flexion to do it.
- Build up the training load gradually. Listen to your body and always complete each set under control.
- Instruction can’t cover all contingencies. There is no substitute for good judgement.
Blog by: Lead instructor, Logan Dube, IG @capewearfly
Original blog posted athttp://www.snclubs.com/blog
Tags:
Related Posts
-

November 26, 2025
Knees Over Toes: Tips for Squats
“You shouldn’t let your knees go over your toes.” A common fitness belief that has been around for ages. It’s easy to be inundated with -
August 1, 2025
Why Every Trainer Should Know the 1.5 Stance
Great coaching isn’t about flashy exercises; it’s about knowing when to use the right variation. The 1.5 stance might not look fancy, but it’s one -
October 30, 2024
Decoding Deadlift Variations: What’s Better?
The pursuit of optimization has instilled a curiosity for asking, “What is the best…” The best answer for us is…it depends. Context matters when giving
We’re here to help you!
Questions, comments or want to register? Fill out the form below and we will contact you shortly. Thanks!
"*" indicates required fields