There are more opinions on deadlift technique than there are Ben & Jerry’s ice cream flavors. How does one decide the correct technique? Who should deadlift? What is the best warm-up for deadlifting? How do you progress to maximize gain, and minimize the risk of injury? Honestly, I’d be writing for a week to answer all of these questions, so I am going to bullet point the answers in this blog and begin to chip away over the next 3 to 4 weeks of VLOG’s. The bullet points that go along with each #VLOG will be added to the #BCPTI Blog weekly shortly after the VLOG is live taped.
Intro:
Below are a few things to consider before deciding on a specific deadlift technique. In preparation for this series, I’ve referenced no fewer than 4 books, and have read numerous research articles ranging from muscle recruitment to specificity. Believe it or not, there’s only 1 consistent to deadlifting; everyone teaches you how to pick s*** up, and put s*** down. There’s no 1 specific technique that will work for everyone.
Choosing Stance or Style: https://youtu.be/sIQ9gYtsNnc
This begs me to ask the question; why are there so many opinions on the topic? The answer I have come up with is simple.. there’s a lot of slight variations to picking things up! (ha-ha) The goal, the person, their current strengths and weaknesses, their current ability to perform the lift with good structure, will all impact the best version for the individual standing in front of the weight. It isn’t about following a strict set of guidelines to maximize the amount of weight that is coming off the floor. To be honest, successful execution, health benefits, and empowerment for the general population can follow a vastly different set of rules than a powerlifter in competition. Let’s not confuse these basic human functional capacities with the max attempts and desires of young gym goers, athletes and powerlifters. The video’s accompanying this blog will definitely speak to various levels of functional performance.
Ps. Don’t worry, I am covering the key elements to behemoth strength / Tarzan gets Jane.
So, what is deadlift? The most imp. question isn’t what, it’s Why! As in, what is the goal of performing or desired outcome of deadlifting. Is it:
- Health & Fitness: creating a strong healthy legs, hips, back & shoulders, improved bone density, muscular strength and testosterone / hormone release. To quote Dr Bobby Cheema who uses this exercise with virtually every young, old, & diagnosed health concerned client he trains. He says: the deadlift is the “Best exercise to remedy and prevent LBP for a lifetime IMO”
- Function in life: picking things and putting things down
- Function in sport / athleticism: improved leg, hip and core strength for improved starting strength and power, first step quickness, vertical jump etc.
- Function in sport / Powerlifting: the sport of powerlifting has very sport specific requirements with one goal, lift as much weight off the floor as possible 1x into a fully extended position.
When most people start digging into deadlift technique, it is very common to come upon information from current or ex-power lifters, and to some degree this isn’t a horrible place to start looking. The reason being that they have likely spent a lot of time learning and testing various deadlift techniques, which in most cases is quite helpful. But, be careful, each of these guys have spent a lot of time examining various techniques, but likely with a strong bias towards what has worked for their specific body type, strength and weaknesses or goals. This is why I have resourced & summarized best practice from several of the most read lifters and itemized them below for you. Trust me, there are plenty of other resources for you to reference as well, and to confuse the issue, there are at least 4 major variations of the deadlift that need to be examined and considered when looking through the different lens above. These include:
- Olympic lifting specific deadlifts,
- Hex Bar deads for fitness and a history of low back problems,
- Sumo deads for people w long femurs,
- Conventional for normal femur to tibia ratios.
And many variations to help achieve or overcome weakness and imbalances (Iso. pulls, block pulls, SLDL, RDL to name a few).
From my review, and in my experience, here’s what I know:
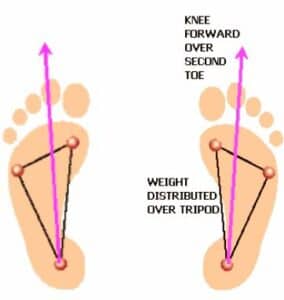
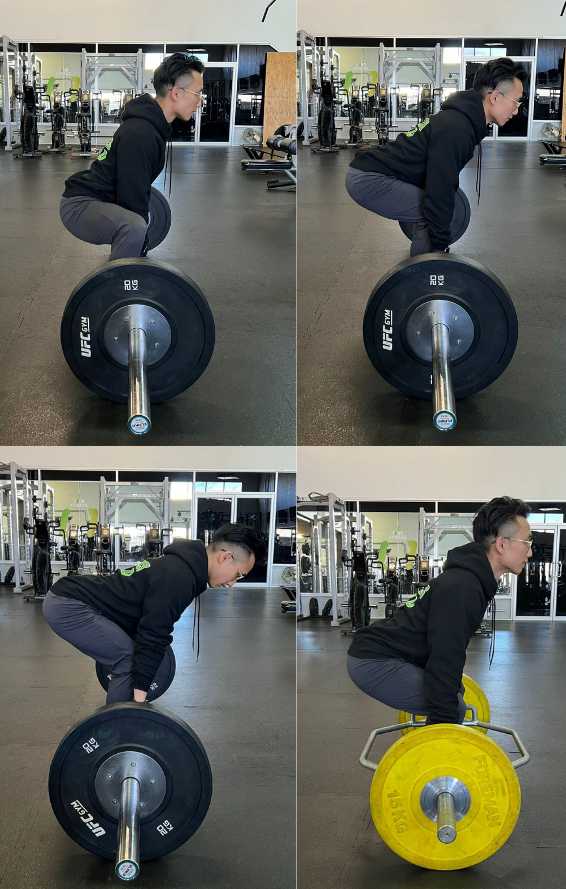
- Set-up:
- Weight Distribution: You absolutely have to feel the load or the or Center of Mass is directly over the of the tripod of the foot. In the traditional squat this typically means a parallel tibia and torso (depending on genetics and tissue restrictions it can alter)
-
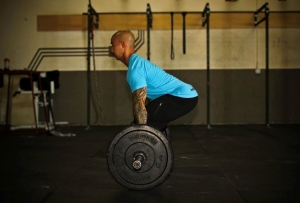
- Height of Hips: In the traditional & sumo deadlift, the weight being lifted is fwd of the lifters of Center of Mass. Therefore, the bodies C of M (belly button & hips) shift backward to compensate. This leads to a larger forward (Neutral) trunk angle than a back squat.
- For the same reason as above, the hips will OFTEN end up higher than the knees. This places the hamstrings and glutes into a stretched position. This helps by loading the elastic potential of these muscles. Since the deadlift is most often optimized when it is hip dominant, this is generally the accepted technique for improved powerlifting (max load) performance.
-
- Sumo Variation: If someone has really strong quads and a relatively weak hip and spinal extension muscles, using a slightly lower position or a sumo deadlift will be advantageous. – Warmup (KB Sumo)https://youtu.be/1DeJNg_dtbw
- Bar Grip: approximately shoulder width using an double over grip. For discussion on grip variations (see M. Rippetoe below). My personal opinion is that grip strength is a major limiting factor in deadlift, Olympic lifting 7 pull-up performance. Therefore, I almost always use a dbl over grip, hook grip if possible.
- Breath: again ever lifter has a preference. Regardless which specific technique you use, always inhale and hold your breath prior to lifting from the floor. I’ll be explaining the rationale for “inhale hold” for increasing spinal stability / IAP here – Warmup (Breath) https://youtu.be/YfYnPAdbUEg
- You can then either exhale as you drive your hips forward, then inhale again before lowering,
- Exhale as you drive the hips fwd., drop the weight if you’re an idiot and don’t want to train half of the lift or hold your inhale all the way up and down, then exhale as you reset for the next rep.
- Core bracing & pre lift tension: One of the most imp pieces to the set-up is learning to maximize tension prior to taking the weight off the ground. For anyone lifting recreationally or professionally, this will help prevent injury and low back pain. A lot of these cues will be explained in the VLOG, but here are a couple of quick cues you are can use:
- Contract as many body-parts as possible – knees push knees / abduct into arms, attempt to bend barbell towards your body, screw your feet into the floor, tighten / brace your core, tongue behind your teeth on roof of your mouth.
- Lifting the weight will be completely covered during the VLOG
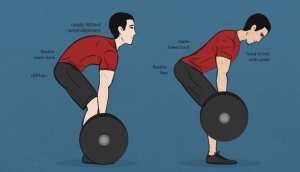
Improper technique:
-
- Spinal alignment and technique: Rounding in the upper or lower back will almost always lead to back problems (i.e. bulging discs). There’s a space in the spine (foramen that houses the spinal nerves). Rounding pushes / compresses the spinal disc fluid backwards and into the nerve space, eventually leading to tingling, numbness and potentially disc rupture
- Teach clients how to hinge in spinal neutralLimit range of motion by lifting from blocks
- Lower weight
- Depending on dominant area of rounding, apply corrective flexibility and strengthening techniques
-
- Straight Bar path: the bar should be travelling straight up and down. This is basic physics & levers. The farther the load is from the fulcrum (i.e. lever length, the greater force required to overcome the load. Due the multiple joint involvement, for deadlifts it’s the C of Mass that matters. As previously indicated, the optimal alignment is the C of Mass will be aligned over the tripod of the foot. Therefore, any bar deviation, particularly fwd will create a ton of additional hip and low back (dominant joint & lever) loading. This is simple, take a video and watch for any deviation of the bar path fwd

Takeaways:
- Sport Practice Is King: if you want to squat more, squat more. If you want to bench more, bench more. If you want to deadlift more, deadlift more.
- Taking an extra 15-20 min to make sure you are completely prepared for the workout ahead will optimize your workout and create training longevity.
- Warm-ups have multiple purposes that include exciting the nervous system. Well performed breathing drills activate muscles throughout the body (i.e. Feet Up Breathing Drills x10–‐20 breaths – focusing on pressing the lower back into the floor.
- When lifting, attempt to drive your shoulders up and back. Achieve this by driving the feet into the ground like attempting to jump up and back.
- Once the bar crosses the knees, flex the lats hard (i.e. pull the bar towards your hips). Do not throw your backward as you are performing this pull, it “turns-off” your glutes at a critical…they actually recommend you chin up as you finish hip extension.
- Toes out often helps the early portion of the lift, “butt” make hip extension (the finish) more difficult.
- Since the deadlift is a concentric only lift, focus all deadlift and accessory training on full pause / stop and go movements. Medball bwd throws & loaded sumo jump squats are great assistance exercises for this.
Takeaways:
- Stance: perform an explosive jump squat. Where ever your feet land is your self-selected best pull position
- Distance from the bar: if the set-up is too close (i.e. against the shin) it will cause the hip to move vertically and excessively load the lower back
- Creating Tension: during set up, pull slack out of the bar. You will hear a click
- Grip: double overhand grips, helps to prevent bicep tears. The underhand grip puts a lot of pressure on the biceps and create longterm problems in the elbow joint (including tears).
- Lowering Execution: to lower the weight, think like an RDL and push the hips back into a strong hinge.
Mark Rippetoe: https://www.youtube.com/watch?v=4AObAU-EcYE
Takeaways:
- Stand such that the bar is right over the middle of the foot. That’s “where everything is in balance”
- When you bend down to get the bar, it must not move. If you drop your hips any further, the change in shin angle will move the bar fwd and out of balance.
- By keeping the bar in contact, you keep the bar aligned w center of the foot.
- “you have to fight for the chest up position”.
- The alt over under grip works (i.e. as the bar rotates fwd in one hand, it rotates & locks bwd into the other) but comes w a price of shoulder asymmetry.
Takeaways:
- If you’re not going for the trophy stop going for the rules of powerlifting
- The bar has to move straight up and down. Regardless how you deadlift, the shin or body has to get out of the way
- Supination (turning hand up) is accompanied by shoulder ext rot, retraction and bwd rotation of the spine. Pronation (turning hand down) is accompanied w protraction of the of the shoulder int rot, protraction and fwd rotation of the spine
Good luck and happy deadlifting!
Chad Benson,
Lead Instructor, BCPTI
Tags:
Related Posts
-
October 30, 2024
Decoding Deadlift Variations: What’s Better?
The pursuit of optimization has instilled a curiosity for asking, “What is the best…” The best answer for us is…it depends. Context matters when giving -

February 29, 2024
Knees Over Toes: Tips for Squats
“You shouldn’t let your knees go over your toes.” A common fitness belief that has been around for ages. It’s easy to be inundated with -
November 1, 2023
Leveraging Body Mechanics: Comprehensive Look at Sumo vs. Conventional Deadlifts
Introduction: The world of deadlifting is rife with discussions comparing Sumo and Conventional styles. Amidst the noise, a misconception often crops up, alleging that Sumo
We’re here to help you!
Questions, comments or want to register? Fill out the form below and we will contact you shortly. Thanks!
"*" indicates required fields